For the last few years I’ve maintained personal projects spread out between Google GCP, Google Domains, WordPress Hosted, GoDaddy, and AWS. This blog is one of the projects among that sprawl.
There’s only a few dozen hits here a day, but for my RSS followers and bookmark-clickers, by the end of the month, steveinit.wordpress.com will cease to exist. steveinit.com will be migrated into a central cloud provider and the website will be rebuilt. Over the last few years I’ve built a few web apps from the ground up, so I figure I’ll make this one of those too.
In the meantime, steveinit.com will point to a construction page linking you back here and will be pointed at my new blog once I feel it’s a solid good-’nuff% complete.
Wow. In early 2023 China is glowing red hot with a massive concentration of Windows 7, which went General Availability in 2009 and End of Support in 2015 (Extended Support expired in 2020). China must be doing a crap job, right? I mean, the US is a tepid salmon in the image. We’re clearly winning. Here in the USA we understand the importance of staying up to date and in support better than the IT pros in China do. At face value the number of instances enumerated by Shodan and the image alone scream to the lack of cyber hygiene in China.
Now consider the populations of both nations. China has a population of 1.4 billion while the United States is around 336 million at time of writing, so the US has about a quarter of China’s population. Well, what’s 118,372/27,591?
Roughly one quarter. While most interesting for understanding scale rather than security, China and the USA have approximately the same per-capital ratio of Windows 7 instances enumerated by Shodan to national population. Well, so much for my high horse. Now, time to self-inflict a gut punch.
Take a second to guess what that one is. Time’s up. That’s Shodan-enumerated Windows Server 2003. The US has about half as many win2003 servers exposed to the internet as China, a nation four times the population of the USA.
And who do those US win2003 servers belong to? After scanning through the results for misfires, a gamut of US companies, with way too many good hits in the tech sector. The glaring one is Amazon, but a cursory looks reveals these as EC2 instances, so let’s pray it’s customers or even better, security labs. One can hope.
But the ISPs don’t have the luxury of shrugging it off. There’s a disconcerting number of ISPs in the US running win2003. Why? Probably the same excuse I’ve heard time and time again, “It runs a business critical application and we have it mitigated.”
In my experience those words are said in little more than half-truths, but that’s not the point.
Instead I’m calling out the perception that Chinese IT is inferior to Western/American IT. I’ve heard with my own ears that the Chinese aren’t as capable of a malicious actor because they don’t understand cybersecurity at the same level as American IT pros. That was said in response to me sharing the first image (win7) to a CS student friend of mine. I’m oversimplifying a little to highlight my own shock, but I ran that line by my friend and he confirmed I’m on message to his (at the time) understanding. This person is inexperienced; a professional from another field who is transitioning to the tech space, and a genuinely intelligent and capable person, but inexperienced by lack of exposure. So why is he underestimating a nation generally understood as a US tech adversary?
Because our perception of our “adversaries” (quotes because there are both genuine threats, but also awesome businesses and orgs in China) is painted by rhetoric. I googled “china information technology worker” and “america information technology worker.” These are the first two rows of images returned.
The American result looks like clean-cut independent professionals accomplishing tasks.
On the other hand, the Chinese results lean harder into groups of casually clad workers in cluttered photos. Even the datacenter and electronics lab look more chaotic.
These images are both heavy in rhetoric since they are media organizations posing an image to support each story. My personal opinion is the American result looks to highlight professional independence more than anything while the Chinese results are portray a more hacky punching-up image, though this is highly subjective. And to be clear, I can alter the image output by changing the search terms or filters. This is just what google thought was most relevant in an incognito tab.
Like I said earlier, China is considered a tech adversary, intentionally towards malicious actors but also in the greater scope of business competition. There are shady actors and awesome organizations both behind the Great Firewall. Still, the numbers don’t lie. China is 1:1 in ratio of win7:population and doing better in ratio of WindowsServer2003:population. Yes, those metrics are thin. Operating system:population is not actionable. It’s just a demonstration of the scale of peers. But, you can easily take two real messages away.
Pride is a weakness in your cyber environment. Don’t overestimate yourself, your environment, or your capabilities.
Humility is a strength almost everywhere. Assume your adversary is stronger than the rhetoric.
Then enrich that mentality with real, actionable intelligence.
This is going to be very simple from an implementation standpoint, since Docker made the setup so easy, but I split this into a second page to highlight discussion around securing a LAN when introducing an intentionally insecure system. WebGoat is a labbing platform centered around lessons. Pretty much all of the lessons can be completed, and are designed to be completed, in browser, but a savvy researcher can try many of the methods from tools outside the browser, which is my plan for Part 3.
Intentionally insecure applications can be a great place to learn TTPs. They are also great place for a malicious actor to get cozy inside your network.
Don’t ever deploy WebGoat or TTPs learned on WebGoat on any production or sensitive network.
Ever. (Unless you’re being paid to PenTest 🙂
Before exposing an intentionally vulnerable application like WebGoat to your LAN, you need to have proper controls in place. A simpler way is to run Kali/Parrot/flavor alongside WebGoat in Proxmox on the same virtual switch, but we want to emulate a real production environment. So let’s talk about controls you can implement, then we’ll lock down WebGoat so the Ubuntu OS only allows WebGoat traffic and doesn’t let it talk back out, which is just good web-server hygiene.
Access Lists on the WebGoat Server
Allow traffic in only on the WebGoat default ports
Allow SSH
Deny outbound traffic
Install SSH for remote access
Allows you to spin up/down the WebGoat container and change firewall rules if needed
Segment your insecure system from your network
WebGoat doesn’t need external access. You should physically or at least logically separate it from everything except your attacking device.
Hardcode the IP on your WebGoat server, then drop all outbound traffic from WebGoat. For now, I don’t even let it reach Canonical (ubuntu) or Docker.
Stop the WebGoat container when it’s not in use.
We’ll walk through the UFW configuration, but segmenting your network is on you. Let’s get started.
Turn on Ubuntu Firewall
$ sudo ufw enable
Install and configure ssh-server to allow remote control
feel free to put a password on the key file if you want
Configure UWF per the steps above
$ sudo uwf allow 8080/tcp
$ sudo ufw allow 9090/tcp
$ sudo ufw allow ssh
$ sudo ufw default reject outgoing
$ sudo ufw enable
As shown above, you can verify the settings in UFW against mine by running $sudo ufw status. This should allow you to hit the default ports for WebGoat, and also allow SSH for control. Now let’s SSH in and start the Docker container. This will be identical to running on localhost, except we’re going to tell Docker to bind WebGoat to the address for Ubuntu’s lan-facing NIC instead of localhost. You can run $ ip addr to view Ubuntu’s IPs, then replace [lan-ip] in the following with the LAN-facing IP.
That’s it. To view the running container run $sudo docker ps
Press ctrl+c to stop WebGoat from the same terminal. If you ran it in the background or access from a second terminal, run $sudo docker ps, grab the Container ID, and stop the container with $sudo docker stop [container-id].
Now you can browse to your WebGoat over the LAN. Go through the lessons built in on the WebGoat on-LAN. There is awesome stuff in there.
As mentioned in the previous post, this being a container, the image rebuilds from scratch each time you spin it up, so you will have to register a user in WebGoat each time.
I have no ETA for Part 3, but my plan is to go through the lessons in the WebGoat UI and also exploit the lessons where possible with tools, as most things done in webforms can also be done from tools.
WebGoat is an OWASP project and java-based web-app deliberately designed to be insecure. Like BadStore and DVWA, WebGoat is a playground for practicing web-app vulnerability exploitation, but WebGoat facilitates those activities through lessons and the lessons contain exploitable targets. It’s not a “flip switches to make it vulnerable” tool like DVWA, instead it’s primarily used for the built-in lessons. Like it’s aforementioned relatives, it’s an older build, but OWASP maintains it to this day, the latest release, WebGoat2023.3, merged into WebGoat’s GitHub repo just a few days ago.
If it’s your first time using a deliberately insecure web-app, I highly recommend running WebGoat from Docker on Kali (or here’s a great video building it from a .jar), as it lets you attack WebGoat directly on the same host if you want to try tools against WebGoat. In this guide, we’ll be installing WebGoat in Ubuntu and accessing the WebGoat UI. Later on, I’ll put out a part 2 where we’ll configure WebGoat for an on-LAN IP address. From there I intend to document lessons/attacks on WebGoat in future posts. I also have a YouTube Walkthrough below of this process. Let’s get baaaaaad.
Spin up a clean install of Ubuntu 22.04. I used Ubuntu Desktop 22.04.1 for my own preferences in this build, but this guide also works with Ubuntu Server and should be compatible with later 22.04-like versions, though you may need to reference updated OWASP WebGoat documentation.
BIG OL’ DISCLAIMER: I am not in any way responsible for outcomes resulting from you following this guide. OWASP makes it very clear that you should be careful with WebGoat, as WebGoat is intentionally insecure and teaches TTPs. Installing this on your machine and/or attaching it to your network will degrade the security of that environment. We’re doing this intentionally to create a place to practice cybersec skills, but it could go wrong if your WebGoat installation is compromised by a genuine malicious attacker. I highly recommend shutting down the container and server when WebGoat is not in use and taking all measures to segregate the server on which your install WebGoat physically and logically from real networks before turning up the WebGoat container.
Obligatory apt-get update
$ sudo apt-get update
If terminal prompts for any updates/upgrades, Apply Them. Our intent is to eventually make this accessible on LAN to practice attacks. You don’t want out of date security patching on an intentionally vulnerable application on your network.
The script should end in “set up the repository.” This is a very basic bash script, just commands, no error handling. Next we’ll install the Docker engine with a similar process. It just occurred to me that this all could be one script. I may refactor the two scripts together, but it’s 1:30am so it’s not happening right now.
If you pulled the code from GH earlier, you already have the next script.
or build in CLI, code below
$ touch installDockerEngine.sh
Open installDockerEngine.sh in your favorite editor, which still isn’t VIM, and paste in the code block below. This is why I use desktop when I can. Life is easier in SublimeText.
$ chmod 700 installDockerEngine.sh
$ ./installDockerEngine.sh
You should see the following Hello from Docker!
Now it’s time to spin up the WebC
Pull WebGoat
$ sudo docker pull webgoat/webgoat
Start the WebGoat container
Don’t forget to fix your timezone. You can see a list of timezones with $ timedatectl list-timezones and pipe it to grep to get close
WebGoat will puke output into terminal for about half a minute. You should then be able to browse to WebGoat on that machine at http://http://127.0.0.1:8080/WebGoat.
Congrats! Your system is now insecure. Register yourself as a new user (you’ll have to do this each time you spin up the container), and check out the documentation if you built this on Ubuntu Desktop. Now you can click the link below for a guide on attaching this to a LAN.
But, when I say it was easy, it doesn’t mean I didn’t learn anything. I started using Linux in 2013, and Kali in 2015. In ten years, I’ve clumped a ridiculous number of how-to sites and YouTube videos together into my understanding of hacking. I’ve used that lumpy amalgam of knowledge to test security configurations for orgs and also against my grown-up toy of a lab. If I had to rank my skills, I’d say I know Linux like a second year LAMP admin and PenTesting at around the same. Even with my limited understanding of these systems and processes, I found few novel topics in this book. So, if you’re a seasoned pro, this probably isn’t the book for you.
But, it’s “Linux Basics for Hackers.” It’s not RHCE or OSCP, so expect basics. This is a book I will recommend going forward to anyone with a budding cybersec interest, but little-to-no experience in Linux or hacking; that helpdesk tech dreaming about cybersec, A+/Sec+ level of understanding. It’s definitely not a first-time-at-keyboard book, but it’s as beginner-level of a Linux/hacking book as a book can be. I didn’t personally see any topics for the first time in this book, but I tried things new to me and definitely reorganized pretty much every topic into more coherent understanding.
The book reads easily as well. OccupyTheWeb (psudonym) is a seasoned instructor and communicator who cuts through the technical mud right into the informative heart of each topic. This isn’t a laborious 2004 Cisco Press book that will leave you considering a career flipping burgers half-way through the first chapter. The content is concise and informative, while the tone is conversational and easy to follow. Each topic follows a rough model of:
Why it matters
What it is
How to do it
With 17 chapters averaging 12 pages, OccupyTheWeb packaged each topic in a nice bite-sized wrapper. I’d say I averaged about an hour of study per chapter, including labbing each out topic out and bouncing back and forth between Kali, Parrot, and Ubuntu, the latter two flavors unnecessary for the book and purely for my own curiosity. This is the kind of book you put on your desk and do a chapter or two a day.
Be warned, the content is very Debian flavored, so if you’re team Red Hat through-and-through, you’ll have to embrace the warm light of apt through this book, except that you wont. I dropped a shiny new image on a laptop just for this book and I didn’t have to install anything else within Kali. Although this book published in 2019, every reference within is still fully baked in Kali 6.0 at first boot, uname for reference, so the yum-or-die oriented folks don’t have to sully their fedora.
There have been a few minor command output changes since the version referenced in the text, as that output was from Kali circa 2018, but nothing major that will take more than a few seconds find in Kali 6.0.
That’s all there is to this. I highly recommend this book for anyone starting their cybersec journey or maybe just looking for a Kali refresher.
On Monday, December 19th, the Toronto-based Hospital for Sick Children (SickKids) put out a press release confirming, “SickKids is currently responding to a cybersecurity incident affecting several network systems.” So many hospitals have been hit lately that, honestly, I can’t remember where I saw it first. Since then we’ve heard this was indeed another healthcare-focused ransomware attack, and the LockBit This morning, a new detail pricked my ear during my morning listen of the Cyber Security Headlines, a podcast by CISO Series. In this episode, I heard the LockBit gang had provided a decryption key at no cost to SickKids, stating basically that the attacker violated the ethics of LockBit by targeting a hospital and LockBit wants to fix that mistake.
Heartwarming as it seems to have an attacker graciously attempt to reverse a mistake, SickKids reported an impact to clinical and corporate systems. While I’m of the opinion this group shouldn’t be lauded, as I’ve seen in some communities, for essentially pulling out the knife, instead of arguing about ethics, I’d like call out an eventuality. Heck, I’d call it an inevitability.
What if this was NotPetya, Azov, CryWiper, or (insert new ransomware. Oh, no it’s a wiper)? It seems wipers are an increasing threat, and anyone in the cybersec game knows attacks are inevitable. So, does that mean it’s just a matter of time until a healthcare organization takes a wiper to the chin? I think it does.
I know my thought train isn’t perfectly linear, so I’ll lay it out.
LockBit attacks SickKids
SickKids operations impacted
LockBit says oops, and provides decrypter
SickKids attempts to restore operations
My brain looks at that list and says, “well, if a malicious attacker violates some group ethic and does this with a wiper, this scenario looks way more dark.”
Attacker attacks Hospital
Hospital operations impacted
Group says oops
Hospital says oops, we weren’t fully prepared
People suffer.
Somehow worse yet, a truly nefarious attacker could do just that without a group or code of ethics out of purely malicious greed. Ransomware has already taken lives. Wipers may have already traveled down my latter thought process, though I couldn’t find confirmation of such in a cursory search.
So, what do you do? I hate to say this, but with my own ears I’ve heard “…we don’t have the budget, so I’m banking on good will.” While that was said in jest, I think there is legitimately some hope of good will in the strategy of poorly funded IT operations. Banking on good will shouldn’t be aimed at malicious activity, and the presence of wipers renders that hope moot.
Know your implementation. Do your backups. Secure your systems. Advocate for security with leadership in the language leadership understands. Let me reiterate the latter point: You likely speak Technical while leadership speaks Strategy. The onus is on you at the cybersec expert to make your communication accessible, applicable, and informative as it moves up the chain. Risk mitigation in $ with projected impact assessments for not mitigating that risk makes a lot more sense to leadership than technical jargon or “An ounce of prevention is worth a pound of cure.”
I haven’t written here in almost 4 years. So, quick update:
Did some time as a NetSecEng before moving into the vendor side – professional services. Loving that. The sheer tech exposure is awesome, and I work for a great company with an incredible product.
I want to get senior in front of my title. I remember when I was aiming to grab engineer and the excitement of grabbing that for the first time six years ago. I feel like a pretty well meet the qualifications of the senior role I’m aiming at, but I’m also a firm believer in hitting from all sides when you want a promotion, so I knocked out the CompTIA CySA+ certification (which led me to scrub much from this site out of social-engineering paranoia).
But I’m also going to re-up my certs. My A+, Net+, Sec+, and CCNA all lapsed. Conveniently, my son is studying for some of those, so I’m going to re-cert along with him.
I make study guides for notes as I go through a cert, and I used to put those here. I think I’m going to take up doing that again.
I’ve played with NetMiko in the past, but never really documented anything I’ve done. It’s a cool tool, so I’ve set Remmina to scrape the SSH session and I’m planning to upload a few posts covering what I use it for.
This post today is just setting up Netmiko and validating function. Short and sweet.
First of all, you have to install NetMiko. I did this on Ubuntu with python3, so that meant dragging down python3-netmiko, python3-paramiko, and python3-scp. I used Synaptic Package Manage, but you can use apt-get or the package manager of your choice. Once you have NetMiko and it’s dependencies installed, pop terminal and open the python3 shell. My input is bold and notes are italicized below.
steve@ubuntu:~$ python3
Python 3.6.5 (default, Apr 1 2018, 05:46:30)
[GCC 7.3.0] on linux
Type "help", "copyright", "credits" or "license" for more information.
>>> from netmiko import ConnectHandler>>> cisco_test = {
... 'device_type': 'cisco_ios',
... 'ip': '192.168.0.1',
... 'username': 'cisco',
... 'password': 'password',
... }
>>> net_connect = ConnectHandler(**cisco_test) >>> net_connect.find_prompt()
'TestSW01#' confirms the connection to the switch>>> output = net_connect.send_command("show ip int br")attempt to send a command>>> print output
File "<stdin>", line 1
print output
^
SyntaxError: Missing parentheses in call to 'print'. Did you mean print(output)? Oops, forgot this is py3.>>> print(output)
Interface IP-Address OK? Method Status Protocol
Vlan1 unassigned YES NVRAM administratively down down
FastEthernet0/1 unassigned YES unset administratively down down
FastEthernet0/2 unassigned YES unset administratively down down
...omitted for brevity...
GigabitEthernet0/3 unassigned YES unset administratively down down
GigabitEthernet0/4 unassigned YES unset administratively down down
>>>
Cool. It’s working! Now I’m going to jump in Atom and write some scripts for the next NetMiko post.
I played with Thousand Eyes back in 2015. I thought it was in interesting tool, but a tad on the buggy side. I don’t remember specifics, just that I had trouble getting ThousandEyes tests to run on the Google Cloud hosted Ubuntu boxes I spun up for that purpose. A colleague recently told me about his positive experience using this network insight tool, so I decided to revisit this. In this post, I’ll discuss deploying the ThousandEyes Enterprise Agent on two VMs: a clean Ubuntu 14.04 on Google Cloud and a WordPress serving Ubuntu 16.04 in AWS.
Note: If you’re following along, create an account for yourself on Thousand Eyes and make sure you can login to the agent dashboard.
Creating the Agents
This post isn’t about spinning up cloud VMs, but I’ll quickly go through what I did to create the servers I’ll be deploying the ThousandEyes agents on.
For the AWS WordPress build, I’m using Amazon Lightsail for simplicity. I navigate to my Lightsale instances and click Create Instance. From there I select “Linux/Unix” for the platform and, under Apps + OS, I select “WordPress.” I choose the “$5/mo with a month free” plan for testing, since I’m going to burn these VMs when I’m done, and click Create. 2 minutes of waiting for the machine to spin up and Voila! Out of the oven pops a WordPress server. I do go into the networking tab and assign a static IP as well.
Google Cloud is even simpler. From the Google Cloud Platform Compute Engine, I set this machine to 1vCPU with 3.75GB of memory and select Ubuntu 14.04 LTS as the boot disk. I leave everything else as defaults and hit Create. That was easy.
Deploying on the VMs
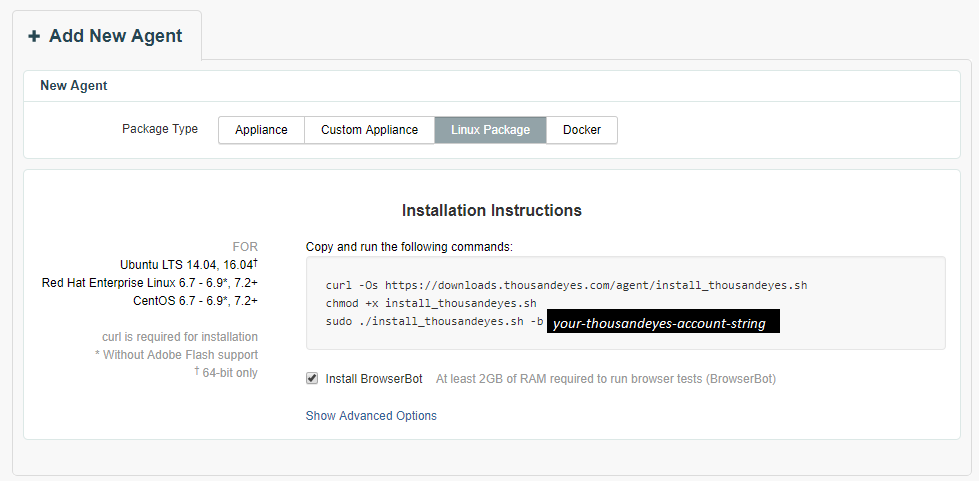
This process is nearly identical on both VMs, so I’m only going to go through this once. From the ThousandEyes Dashboard, navigate through Settings/Agents/Enterprise Agents and click +Add New Agent. Next to “Package Type” select Linux Package and you’ll see the following:
SSH in and follow the directions. Also, I kept the default log path, but you can change it if you want to. This the output you want, except for the few “[ OK ]” my snippet cut off because I resized my SSH client.
Now if you look at the bottom of your agent screen, you should see the hostname of the server you just installed Enterprise Agent on, like this:
Boom! You’re done. I do have 4 agents because I pre-built the top two in the image above to make sure I could do this before writing a blog post. Don’t worry about the N/A under utilization. It will go away in a few minutes. That’s it, though. Your agents are running and it was easy!
Setting up a test in ThousandEyes
This too is pretty easy, assuming you have at least a little networking experience. From the ThousandEyes Dashboard, navigate through Settings/Agents/Tests and click +Add New Test. I want to do a webpage load test to Amazon, so I’m going to go under “New Test” and select Web and Page Load. For the URL, I’ll enter the full protocol:string https://www.amazon.com set the interval for 2 minutes and select all four of my agents from the “Agents” dropdown. Note that you can run some tests from the ThousandEyes owned nodes from the dropdown as well. Go ahead and click Run Once at the bottom to verify function. Assuming good data comes back, click Create New Test.
Now navigate to Views/Tests and you got data.
The Takeaway
I’m impressed. The whole process took maybe 15 minutes for two servers. The instructions were simple and deployed the agent flawlessly. The test creation and associated output are both intuitive and useful. So, now I’m going to set up a few more tests and let these ThousandEyes collect data for a couple weeks. Expect part two of the series on ThousandEyes in early March where I’ll break down what else I’ve done and my impression over time.
As an aspiring networking pro, I am always looking for new ways to learn anything I can possibly cram into my brain. Unfortunately, I don’t have a whole lot of time to waste trudging through massive technical books. I already spend most of my home time cramming things like BGP, content switching policies, and data center facilities standards. Still, I want to learn more. Since I feel like vendor docs are full of bias, I prefer to use the filter of blogs and podcasts by people trusted within our industry to fill that gap.
Anyone who has been in networking for more than a few blinks has googled a problem while waiting for an answer from technical support. There’s a very good chance you found your answer on a blog. For example, I recently ran into a problem where I found an interface in an LACP Etherchannel that had dropped four times as much layer 2 receive traffic as the other interfaces in the port-channel. After consulting my Sr. Engineer, who pointed out the likelihood of a physical issue, I started searching for the problem. I was using a 7 meter passive TwinAx cable to go back to the core switch, which had been supplied by a vendor. It doesn’t get much simpler than passive TwinAx, it’s practically copper ethernet, so I started looking at the cable as the potential culprit. A little googling later and I found that passive TwinAx becomes unreliable at best beyond 5 meters. I swapped the run for OM3 on short-range SFPs and Viola! The interface counters normalized, even counting far lower than the other two TwinAx connected links. Thanks to a blog, I solved in an hour what would have been a multi-hour shuffle around by the vendor. I also took a moment to add the RSS feed of that blog to my outlook.
Podcasts solve another challenge: What should I do during my long boring commute? Well, I could move closer! Oh yeah, houses are expensive inside the perimeter. No thanks, I’ll just listen to podcasts while I drive. Podcasts actually pointed me down the path into infrastructure networking. I googled my way to the Packet Pushers Podcast as I was trying to sort out what I wanted to do in IT. Since then, I’ve enjoyed their take on the networking world 2-3 commutes a week (and I’ve joined Ethan Banks and Greg Ferro as a podcasts guest for two fun-filled shows). That leaves me with left over boring commute time, so I found more podcasts! Problem solved. I’m using my time to it’s fullest. If you’re new to podcasts, the process is simple. Search for the podcast by name in iTunes or your favorite podcatcher and add the podcast to your feed. Note: I prefer Stitcher. Not everything is on Stitcher, so I also have Podcast Addict on my phone for a few exceptions.
When I started to follow these blogs and podcasts I didn’t know the impact they would have on my professional work. I took my will to avoid breathy whitepapers (which still have their place) and boring commute and turned them into the opportunity to be more proficient in my job. I’m hoping these examples inspire you to add a few blogs to your RSS feed or follow a podcast or two.
This post is long enough, so I’m just going to list a few of the blogs and podcasts I frequent most often. If you have any blogs or podcasts to recommend, please do so in the comment section below. These are just my go-to resources, but I’d like to know what you use. Hope this helps you in your journey!


 .
.

