I played with Thousand Eyes back in 2015. I thought it was in interesting tool, but a tad on the buggy side. I don’t remember specifics, just that I had trouble getting ThousandEyes tests to run on the Google Cloud hosted Ubuntu boxes I spun up for that purpose. A colleague recently told me about his positive experience using this network insight tool, so I decided to revisit this. In this post, I’ll discuss deploying the ThousandEyes Enterprise Agent on two VMs: a clean Ubuntu 14.04 on Google Cloud and a WordPress serving Ubuntu 16.04 in AWS.
Note: If you’re following along, create an account for yourself on Thousand Eyes and make sure you can login to the agent dashboard.
Creating the Agents
This post isn’t about spinning up cloud VMs, but I’ll quickly go through what I did to create the servers I’ll be deploying the ThousandEyes agents on.
For the AWS WordPress build, I’m using Amazon Lightsail for simplicity. I navigate to my Lightsale instances and click Create Instance. From there I select “Linux/Unix” for the platform and, under Apps + OS, I select “WordPress.” I choose the “$5/mo with a month free” plan for testing, since I’m going to burn these VMs when I’m done, and click Create. 2 minutes of waiting for the machine to spin up and Voila! Out of the oven pops a WordPress server. I do go into the networking tab and assign a static IP as well.
Google Cloud is even simpler. From the Google Cloud Platform Compute Engine, I set this machine to 1vCPU with 3.75GB of memory and select Ubuntu 14.04 LTS as the boot disk. I leave everything else as defaults and hit Create. That was easy.
Deploying on the VMs
This process is nearly identical on both VMs, so I’m only going to go through this once. From the ThousandEyes Dashboard, navigate through Settings/Agents/Enterprise Agents and click +Add New Agent. Next to “Package Type” select Linux Package and you’ll see the following: 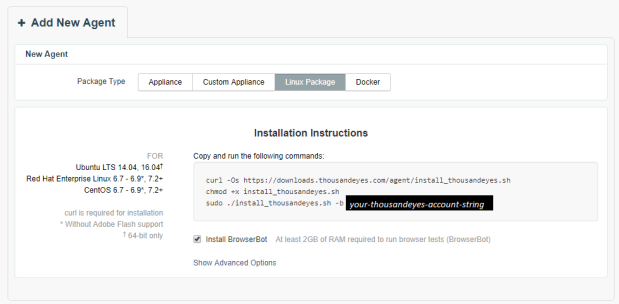
SSH in and follow the directions. Also, I kept the default log path, but you can change it if you want to. This the output you want, except for the few “[ OK ]” my snippet cut off because I resized my SSH client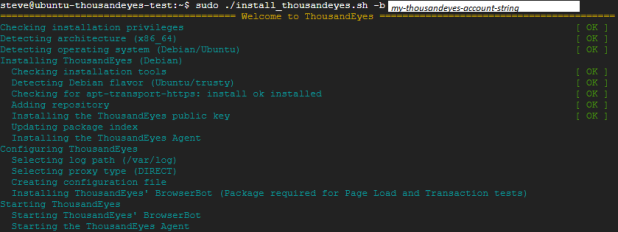 .
.
Now if you look at the bottom of your agent screen, you should see the hostname of the server you just installed Enterprise Agent on, like this:
Boom! You’re done. I do have 4 agents because I pre-built the top two in the image above to make sure I could do this before writing a blog post. Don’t worry about the N/A under utilization. It will go away in a few minutes. That’s it, though. Your agents are running and it was easy!
Setting up a test in ThousandEyes
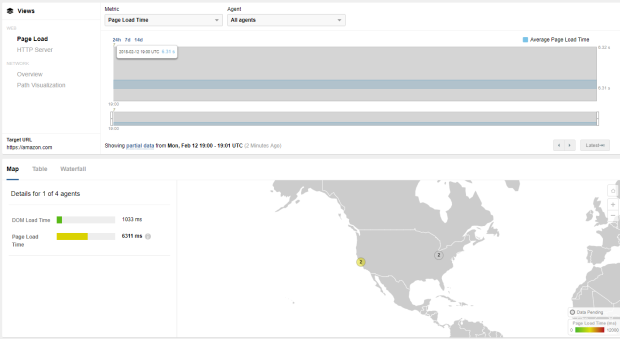
This too is pretty easy, assuming you have at least a little networking experience. From the ThousandEyes Dashboard, navigate through Settings/Agents/Tests and click +Add New Test. I want to do a webpage load test to Amazon, so I’m going to go under “New Test” and select Web and Page Load. For the URL, I’ll enter the full protocol:string https://www.amazon.com set the interval for 2 minutes and select all four of my agents from the “Agents” dropdown. Note that you can run some tests from the ThousandEyes owned nodes from the dropdown as well. Go ahead and click Run Once at the bottom to verify function. Assuming good data comes back, click Create New Test.
Now navigate to Views/Tests and you got data.
The Takeaway
I’m impressed. The whole process took maybe 15 minutes for two servers. The instructions were simple and deployed the agent flawlessly. The test creation and associated output are both intuitive and useful. So, now I’m going to set up a few more tests and let these ThousandEyes collect data for a couple weeks. Expect part two of the series on ThousandEyes in early March where I’ll break down what else I’ve done and my impression over time.
